 Jenna Williams for E!
There's a certain type of girl for which DIY nail art seems tailored—you know, those particularly crafty, Taylor Swift-types who were born with a penchant for precision and a remarkably steady hand.
More power to those girls, but that just ain't us. Does that mean we should be stuck paying salon prices in order to rock the type of graphic, negative-space nail art that stars like Gigi Hadid and Jessie J do?
In the words of a certain creative freedom-fighting troubadour, oh, hecky nah.
So we challenged to our friends at Enamel Diction—an LA-based salon that counts Maria Menounos, Kelly Rowland and Adrienne Bailon as clients—to provide us with an of-the-moment manicure idea that even the most artistically-challenged nail-art lover can do. The result is this negative-space-and-studs look created by manicurist Jassey Hilotin—and the method, we're pleased to report, passed our clunky, litmus test of incoordination with flying colors. Here's how to get the look for yourself.
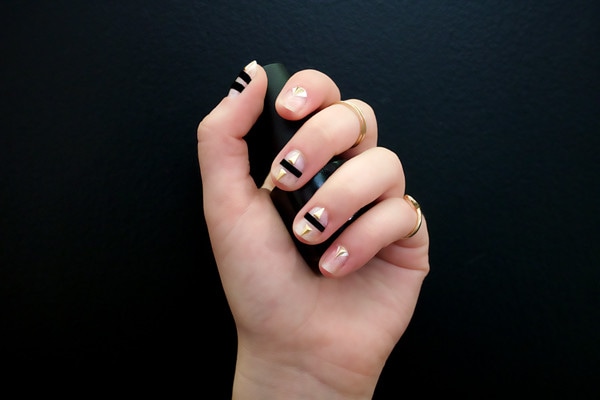
Assemble the tools: Gather a thin, pointed-bristle nail art brush, a medium nail art brush, black nail polish, white nail polish, gold triangular studs, nail glue and tweezers.
Prep the nail: File your nails in the shape you prefer to wear and apply a base coat, allowing five minutes to dry.
Draw inverted triangles: Dip a thin nail art brush with pointed bristles into white nail polish and freehand an inverted "V" shape near the cuticle on the index and pinky fingers. To make the process even more simple, try taping off the section of nail that you don't wish to paint; this will allow you to color outside of the lines without ruining the triangular shape.
Create black horizontal lines: Dip a medium-width nail art brush into black nail polish and swipe horizontal lines across the center of your middle fingers, ring fingers and thumbs. Pro tip: Jassey suggested using acrylic paint instead of nail polish to create the triangles and lines, since its thicker consistency allows for more control and cleaner freehand. (Don't worry, the paint will come off with ordinary nail polish remover.)
Add bling: To apply triangle studs, dot a touch of nail glue on your nail, grip the stud with a pair of tweezers and affix to the center of the white triangles and on either side of the black horizontal lines. Nail glue is incredibly strong, so be careful not to get it on your skin or tweezer tips—it can make this easy DIY a super-sticky nightmare.
Paint a clear top coat: If you applied too much glue to the nail, the design might look a bit messy. Don't panic—a brush of clear top coat will clean up the look and make it appear as if it was done by a pro. While you allow a full five minutes for the clear coat to dry, dream up an equally major Instagram caption—because the end result will look good enough to go mano a mano with the most stellar of DIY queens, no matter what your skillset.